Self-Host JudgeLib
Deploy JudgeLib on your own infrastructure with Docker and Kubernetes for maximum control, reliability, and performance.
Why Self-Host?
Full Control
- Deploy on any cloud provider
- Customize resource limits
- Configure security policies
Better Performance
- No free tier limitations
- Horizontal auto-scaling
- Dedicated resources
Choose Your Learning Path
Select how you want to get started with JudgeLib self-hosting
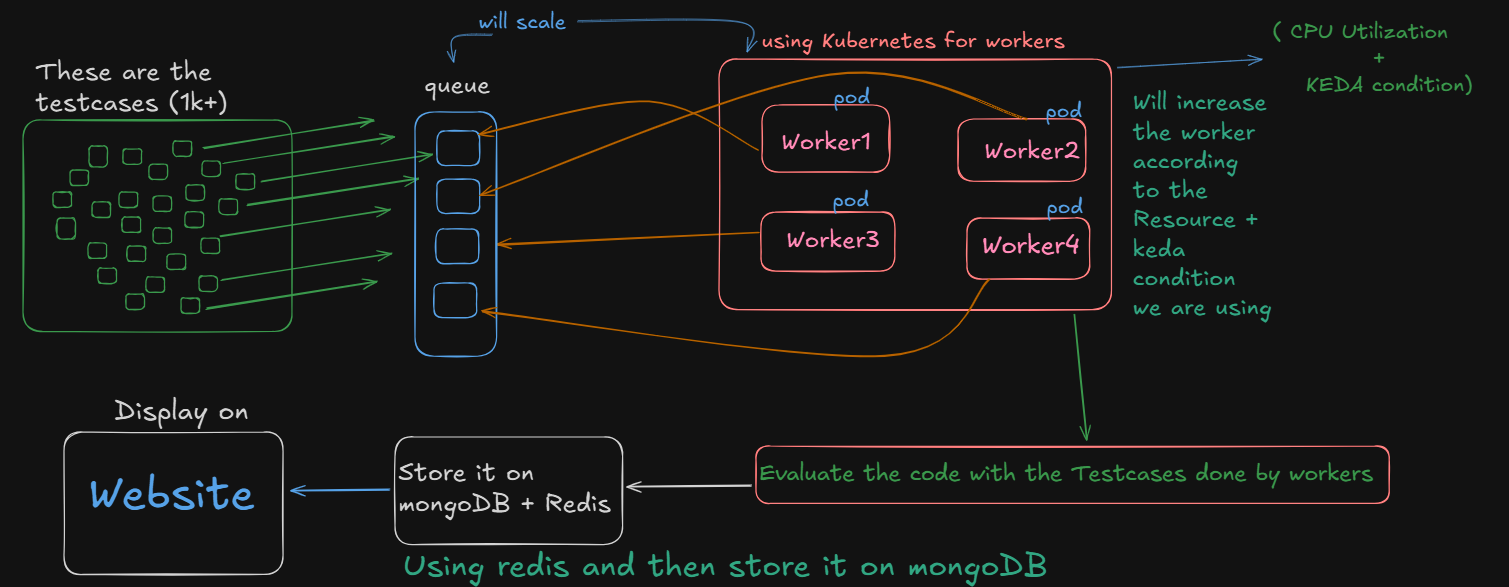
Architecture Overview
Workflow overview and architecture
Read Documentation
Detailed step-by-step written guide
Sample Code
Ready-to-use code examples and snippets
Architecture Overview
Understand the self-hosting architecture and deployment process.
Install NPM Package
Install lib-judge in your application
Deploy Worker
Run the worker container with Redis
Scale with K8s
Auto-scale with Kubernetes
Prerequisite Requirements
Chocolatey Package Manager
Chocolatey is a package manager for Windows that simplifies the installation of software and dependencies. It is required for managing packages in your self-hosted environment.
Note: Follow the official Chocolatey installation guide to ensure proper setup. You may need administrator privileges to install Chocolatey on your system.
Install Kubernetes CLI (kubectl)
The Kubernetes CLI (kubectl) is required to interact with your Kubernetes cluster. You can install it using Chocolatey after the package manager is set up.
Tip: After installation, verify by running kubectl version --client in your terminal.
Install Kind (Kubernetes IN Docker)
Kind is a tool for running local Kubernetes clusters using Docker containers as nodes. It's especially useful for testing and development environments.
Tip: After installation, verify Kind is installed by running kind version in your terminal.
Setup Helm
Helm is a package manager for Kubernetes that helps you define, install, and upgrade Kubernetes applications. Use it to deploy monitoring and other services to your cluster.
Tip: Helm makes it easy to manage complex Kubernetes deployments with pre-configured charts.
Port Forward to Redis (OPTIONAL)
Port forwarding allows you to access Redis running inside your Kubernetes cluster from your local machine. This is useful for development and debugging purposes.
Tip: This command forwards port 6379 from your Redis pod to your local machine.
Get Started
Install NPM Package
First, install the lib-judge package in your Node.js application:
npm install lib-judgeEnvironment Configuration
Create a .env file and add the Redis configuration variables:
Deploy Worker Container (OPTIONAL)
Pull the worker image and run it with your Redis configuration:
docker pull lightningsagar/worker:210b8cfd943b24e7381c4c8f1f3114c2d1fd3d81Setup Kubernetes Operations
Clone the operations repository that contains Kubernetes configurations with horizontal pod autoscaling:
git clone https://github.com/lightning-sagar/worker-opsCustomizable: You can modify the code in the ops repository to suit your specific deployment requirements and infrastructure needs.
Deploy to Kubernetes
Apply Kubernetes Configurations
Deploy your JudgeLib worker with horizontal pod autoscaling enabled
Create Cluster:
kind create cluster --config .\cluster.yml -n workers-clustersCreate namespace:
kubectl create namespace judge-namespaceApply the deployment configuration:
kubectl apply -f judge-workersAuto-scaling Benefits
The HPA configuration automatically scales your worker pods based on CPU usage and request load, ensuring optimal performance and cost efficiency.
Using lib-judge in Your Code
Sample Implementation
Here's how to use the lib-judge package in your Node.js application
const result = await judge({
  codePath: tmpPath,
  ques_name: `question_${Date.now()}`,
  input,
  output,
  timeout: timeout, // in seconds
  sizeout: sizeout,
  language: langCode, // py, cpp, java
});
// or checkout the full code example here https://github.com/lightning-sagar/Judge/
Parameters:
codePathPath to the code file to execute
ques_nameUnique identifier for the question/execution
inputInput data for the code execution
outputExpected output for validation
timeoutExecution timeout in seconds
sizeoutMemory limit for execution
languageProgramming language (py, cpp, java)